 |
Embedded TCP/IP stack
4.7.0
|
 |
Embedded TCP/IP stack
4.7.0
|
Tools used during this quick start:
Follow these steps to run the FNET Shell demo application:
fnet\fnet_demos\build\<board_name>\shell\bm\<compiler_name>\
fnet\fnet_demos\build\<board_name>\shell\freertos\<compiler_name>\This FreeRTOS application has absolutely the same features and behaviour as the baremetal one.
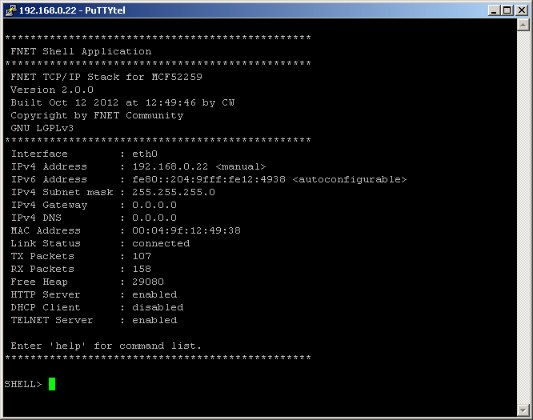
************************************************
 FNET Shell Application
************************************************
 FNET TCP/IP Stack for MK64FN1
 Version 4.0.0
 Built Oct 26 2017 at 13:14:08 by IAR

 Enter '?' for command list.
************************************************
[FAPP] Application parameters loaded from Flash.
SHELL>
FAPP_CFG_LINK_CONNECT_SCRIPT and FAPP_CFG_LINK_DISCONNECT_SCRIPT in fapp_user_config.h[LINK] eth0: connected => Script: dhcpc autoip -n eth0; mdns -n eth0; llmnr -n eth0; ************************************************ DHCPv4 Client started. Interface : eth0 ************************************************ Press [Ctr+C] to cancel. [DHCP] Discovering... ************************************************ IPv4 parameters updated : ************************************************ Ethernet Interface <default>: Name : eth0 ScopeID : 1 Media State : connected IPv4 Address : 192.168.0.102 <dhcp> IPv6 Address : fe80::211:22ff:fe33:4455 <autoconfigurable> IPv4 Subnet mask : 255.255.255.0 IPv4 Gateway : 192.168.0.1 IPv4 DNS : 192.168.0.1 DHCP Client : on DHCP Server Address : 192.168.0.1 AUTOIP Service : off LLMNR Server : off MDNS Server : off ************************************************ mDNS server started. Interface : eth0 Host Name : fnet ************************************************ ************************************************ LLMNR server started. Interface : eth0 Host Name : fnet ************************************************ SHELL>
FAPP_CFG_STARTUP_SCRIPT parameter to a command line string.SHELL> mdns ************************************************ mDNS server started. Interface : eth0 Host Name : fnet ************************************************
SHELL> llmnr
************************************************
 LLMNR server started.
 Interface            : eth0
 Host Name            : fnet
************************************************
So you can use the host name "fnet" instead of an IP address to find this node on the local network.
>         ?                                    - Display this help message
>       set [<parameter> <value>]              - Set parameter
>       get [<parameter>]                      - Get parameters
>      bind [-n <if name>] <IP6 address>       - Bind IPv6 Address
>    unbind [-n <if name>] <IP6 address>       - Unbind IPv6 Address
>      info [-n <if name>]                     - Show interface info
>      stat [-n <if name>]                     - Show interface statistics
>     dhcpc [-n <if name>] [release|autoip]    - Start DHCPv4 client
>    autoip [-n <if name>] [release]           - Start Auto-IP service
>      http [release]                          - Start HTTP server
>       exp                                    - File Explorer submenu...
>    telnet [release]                          - Start Telnet server
>       dns [-n <if name>] [-s <server ip>] [4|6] <host name> - Resolve IPv4|6 address of <host name>
>     llmnr [-n <if name>] [release]           - Start LLMNR server
>      mdns [-n <if name>] [release]           - Start MDNS server
>      sntp [<server name|ip>]                 - Resolve time over SNTP
>      save                                    - Save parameters to the FLASH
>     reset                                    - Reset the board
>      ping [-c <count>][-i <seconds>]
                [-p <pattern>][-s <size>]
                [-h <hoplimit/ttl>] <ip>        - Send ICMP ECHO requests
SHELL>set address <default-if IPv4 address> set gateway <default-if IPv4 gateway address> set netmask <default-if IPv4 netmask address> set mac <default-if Ethernet address>
SHELL> dhcpc
************************************************
 DHCPv4 Client started.
 Interface            : eth0
************************************************
Press [Ctr+C] to cancel.
[DHCP] Discovering...

************************************************
 IPv4 parameters updated :
************************************************
Ethernet Interface <default>:
 Name                 : eth0
 ScopeID              : 1
 Media State          : connected
 IPv4 Address         : 192.168.0.102 <dhcp>
 IPv6 Address         : fe80::211:22ff:fe33:4455 <autoconfigurable>
 IPv4 Subnet mask     : 255.255.255.0
 IPv4 Gateway         : 192.168.0.1
 IPv4 DNS             : 192.168.0.1
 DHCP Client          : on
 DHCP Server Address  : 192.168.0.1
 AUTOIP Service       : off
 LLMNR Server         : off
 MDNS Server          : off

SHELL>
SHELL> autoip
************************************************
 Auto-IPv4 service started.
 Interface            : eth0
************************************************
Press [Ctr+C] to cancel.
[AUTOIP] Probing...
[AUTOIP] Probing...
[AUTOIP] Probing...

************************************************
 IPv4 parameters updated :
************************************************
Ethernet Interface <default>:
 Name                 : eth0
 ScopeID              : 1
 Media State          : connected
 IPv4 Address         : 169.254.67.77 <autoconfigurable>
 IPv6 Address         : fe80::211:22ff:fe33:4455 <autoconfigurable>
 IPv4 Subnet mask     : 255.255.0.0
 IPv4 Gateway         : 192.168.0.1
 IPv4 DNS             : 192.168.0.1
 DHCP Client          : off
 AUTOIP Service       : on
 LLMNR Server         : on
 MDNS Server          : on

SHELL>
autoip parameter to the dhcpc command. DHCP client will continue its DHCP server discovering, while Auto-IP is active. The DHCP discovery period defined by FAPP_CFG_DHCPC_CMD_RESPONSE_TIMEOUT_AUTOIP_MS.save command to save the all run-time parameters to non-volatile memory (it is located in the last erase page of the on-chip flash memory). SHELL> save Application parameters saved SHELL>
save command does not save the ip parameter in case it was allocated by a DHCP server to avoid IPv4 address conflict during the system startup.info command into your terminal program window. SHELL> info Ethernet Interface <default>: Name : eth0 ScopeID : 1 Media State : connected IPv4 Address : 192.168.0.102 <dhcp> IPv6 Address : fe80::211:22ff:fe33:4455 <autoconfigurable> IPv4 Subnet mask : 255.255.255.0 IPv4 Gateway : 192.168.0.1 IPv4 DNS : 192.168.0.1 DHCP Client : on DHCP Server Address : 192.168.0.1 AUTOIP Service : off LLMNR Server : on MDNS Server : on Services: HTTP Server : off HTTPS Server : off TELNET Server : off SHELL>
ping <your_board_IP_adress>By default the ping routine will send a test ICMP frame to the board four times and will write a summary message on the screen. If everything works as expected, you should see an output similar to this:
C:\Temp>ping 192.168.0.22

Pinging 192.168.0.22 with 32 bytes of data:
Reply from 192.168.0.22: bytes=32 time=10ms TTL=64
Reply from 192.168.0.22: bytes=32 time<1ms TTL=64
Reply from 192.168.0.22: bytes=32 time<1ms TTL=64
Reply from 192.168.0.22: bytes=32 time<1ms TTL=64

Ping statistics for 192.168.0.22:
    Packets: Sent = 4, Received = 4, Lost = 0 (0% loss),
Approximate round trip times in milli-seconds:
    Minimum = 0ms, Maximum = 10ms, Average = 2ms
C:\Temp>ping fe80::204:9fff:fe12:4938%19

Pinging fe80::204:9fff:fe12:4938%19 with 32 bytes of data:
Reply from fe80::204:9fff:fe12:4938%19: time<1ms
Reply from fe80::204:9fff:fe12:4938%19: time<1ms
Reply from fe80::204:9fff:fe12:4938%19: time<1ms
Reply from fe80::204:9fff:fe12:4938%19: time<1ms

Ping statistics for fe80::204:9fff:fe12:4938%19:
    Packets: Sent = 4, Received = 4, Lost = 0 (0% loss),
Approximate round trip times in milli-seconds:
Minimum = 0ms, Maximum = 0ms, Average = 0msping into your terminal program window. SHELL> ping 192.168.0.1 ************************************************ PING ************************************************ Remote IP addr : 192.168.0.1 Message Size : 63 Num. of messages : 4 Pattern : 0 Hoplimit (TTL) : 64 Press [Ctr+C] to cancel. ************************************************ Reply from 192.168.0.1 Reply from 192.168.0.1 Reply from 192.168.0.1 Reply from 192.168.0.1 SHELL>
http into your terminal program window. SHELL> http ************************************************ HTTP server started. IPv4 Address : 192.168.0.22 IPv6 Address : fe80::204:9fff:fe12:4938 ************************************************ SHELL>
http:// 192.168.0.22or
http:// [fe80::204:9fff:fe12:4938]

telnet into your terminal program window. SHELL> telnet ************************************************ Telnet server started. IPv4 Address : 192.168.0.22 IPv6 Address : fe80::204:9fff:fe12:4938 ************************************************ SHELL>


dns <host_name> 4|6 into the command shell window. dns www.google.com 4 in your terminal program window: SHELL> dns 4 www.google.com ************************************************ Resolving : www.google.com DNS Server : 192.168.0.1 Press [Ctr+C] to cancel. ************************************************ Resolved address : 172.217.19.68 TTL=2147483648 Resolved address : 216.239.32.10 TTL=2013724672 Resolved address : 216.239.34.10 TTL=2013724672 Resolved address : 216.239.36.10 TTL=2013724672 Resolved address : 216.239.38.10 TTL=2013724672For example, if you want to get know the IPv6 address of www.google.com, enter
dns www.google.com 6 in your terminal program window: SHELL> dns 6 www.google.com ************************************************ Resolving : www.google.com DNS Server : 192.168.0.1 Press [Ctr+C] to cancel. ************************************************ Resolved address : 2a00:1450:4005:803::2004 TTL=604045312 Resolved address : 2001:4860:4802:32::a TTL=2653487104 Resolved address : 2001:4860:4802:34::a TTL=2653487104 Resolved address : 2001:4860:4802:36::a TTL=2653487104 Resolved address : 2001:4860:4802:38::a TTL=2653487104
dns parameter is set to correct IP address of the DNS server on your network. It can be set manually by the set command or can be obtained automatically by the DHCP IPv4 client service.sntp SHELL> sntp pool.ntp.org ************************************************ Resolving : pool.ntp.org DNS Server : 192.168.0.1 Press [Ctr+C] to cancel. ************************************************ Resolved address : 31.31.74.35 TTL=486539264 Resolved address : 147.251.48.140 TTL=486539264 Resolved address : 212.96.160.147 TTL=486539264 Resolved address : 37.187.104.44 TTL=486539264 Resolved address : 207.171.17.42 TTL=1209337600 Resolved address : 185.120.22.23 TTL=348913664 Resolved address : 185.121.173.155 TTL=348913664 Resolved address : 212.25.19.23 TTL=348913664 Resolved address : 174.127.124.192 TTL=348913664 Resolved address : 85.214.25.217 TTL=348913664 Resolved address : 185.82.172.118 TTL=348913664 Resolved address : 199.249.224.53 TTL=348913664 Resolved address : 178.63.120.205 TTL=348913664 ************************************************ SNTP Resolving SNTP Server : 31.31.74.35 Press [Ctr+C] to cancel. ************************************************ ************************************************ SNTP Resolving SNTP Server : 147.251.48.140 Press [Ctr+C] to cancel. ************************************************ UTC: 2018-6-19 7:48:28.134 SHELL>