In this demo, you will learn how to connect your device to the cloud by using Azure IoT Hub
What you do:
- Create an IoT hub.
- Register a device in your IoT hub.
- Run the FNET Azure IoT demo application to send data to your IoT hub.
What you need
Create an IoT hub
- Sign in to the Azure portal.
- Select [Create a resource] -> [Internet of Things] -> [IoT Hub].
- In the IoT hub pane, choose your Subscription, Resource group, Region, Hub Name and Pricing.
- Finally, select [Create]. Your IoT hub might take a few minutes to create.
- In your IoT hub navigation menu, open [Shared access policies].
Select the [iothubowner] policy, and then copy the [Connection string—primary key]. You need this service connection string later to enable a back-end application to connect to your IoT hub.
Register a device in the IoT hub
- A device must be registered with your IoT hub before it can connect.
- In your IoT hub navigation menu, open [IoT devices], then click [Add] to register a device.
- Enter a Device ID for the new device, then click [Save].
- After the device is created, open the device from the list in the [IoT devices] pane.
- Copy the [Connection string—primary key] content to use later. You need this connection string to connect your device to your IoT hub.
Run Azure demo application
- Prepare your evaluation board according to your board User Manual.
- Use USB or RS-232 male/female DB-9 serial cable to connect your PC (through COM port) to the evaluation board.
- Connect the evaluation board to an Ethernet network, which must be connected to Internet.
- Power the board up.
- Invoke the terminal program on the PC to which the evaluation board is connected and configure it to:
- Bits per second: 115200.
- Data bits: 8.
- Parity: none.
- Stop bits: 1.
- Flow control: None.
- Launch IDE.
- Open the FNET demo project:
fnet\fnet_demos\build\<board_name>\shell_azure\freertos\<compiler_name>\
- Open the demo application configuration file:
\fnet\fnet_demos\src\shell_azure\fapp_user_config.h
and add the following line to it #define FAPP_CFG_AZURE_CMD_DEVICE_CONNECTION_STRING "Your_device_connection_string"
"your_device_connection_string" must be replaced by the device connection string you made a note of previously. Then save your changes.
- Compile, load/flash and run the application on the board.
- In your terminal program window you should see the FNET application welcome message:
[FREERTOS] Starting scheduler.

************************************************
 FNET Shell Application (Azure)
************************************************
 FNET TCP/IP Stack for MK64FN1
 Version 4.5.0
 Built Jul 19 2018 at 10:46:38 by IAR

 Enter '?' for command list.
************************************************
[FAPP] Application parameters loaded from Flash.
SHELL>
- If you have connected the Ethernet interface to a local link, you should see in the terminal window:
[LINK] eth0: connected => Script: dhcpc autoip; mdns; llmnr; sntp
************************************************
 DHCPv4 Client started.
 Interface            : eth0
************************************************
Press [Ctr+C] to cancel.
[DHCP] Discovering...
[DHCP] Discovering...

************************************************
 IPv4 parameters updated :
************************************************
Ethernet Interface <default>:
 Name                 : eth0
 ScopeID              : 1
 Media State          : connected
 MAC Address          : 00:11:22:33:44:55
 IPv4 Address         : 192.168.0.105 <dhcp>
 IPv6 Address         : fe80::211:22ff:fe33:4455 <autoconfigurable>
 IPv4 Subnet mask     : 255.255.255.0
 IPv4 Gateway         : 192.168.0.1
 IPv4 DNS             : 192.168.0.1
 DHCP Client          : on
 DHCP Server Address  : 192.168.0.1
 AUTOIP Service       : off
 LLMNR Server         : off
 MDNS Server          : off

************************************************
 mDNS server started.
 Interface            : eth0
 Host Name            : fnet
************************************************
************************************************
 LLMNR server started.
 Interface            : eth0
 Host Name            : fnet
************************************************
************************************************
 SNTP Requesting
 SNTP Server          : 89.221.210.188
Press [Ctr+C] to cancel.
************************************************
 UTC: 2018-7-23 12:43:13.582
SHELL>
- This application has absolutely the same features and behaviour as the Shell demo application. So before next steps, read about it in FNET Shell Demo Quick Start.
In addition, the application has:
- Install and run the Device Explorer tool:
- It is available here (https://github.com/Azure/azure-iot-sdk-csharp/releases/download/2018-1-23/SetupDeviceExplorer.msi)
- You can use this tool to monitor events from your device, and send messages to your device. More information here
- In the [Configuration] tab, add the connection string for your IoT Hub. The service connection string you made a note of previously, during Create an IoT hub.
Then click [Update].
- Navigate to [Data] tab. Select the device name you created from the drop-down list of device IDs and click [Monitor] button.
Device Explorer is now monitoring data sent from the selected device to the IoT Hub.
- Run the Azure IoT demo application which connects to a device endpoint on your IoT hub, sends simulated temperature and humidity telemetry messages, and listens for messages from your hub.
Type the azure command into your terminal program window:
SHELL> azure
************************************************
 Azure IoT Hub Telemetry example
 Period (sec)         : 16
 Message number       : infinite
Press [Ctr+C] to cancel.
************************************************
[AZURE_APP] IoT Hub Connection is authenticated (OK)
[AZURE_APP] Sending message [0]: {"temperature":29.00,"humidity":70.00}
[AZURE_APP] Message [0] is received by IoT Hub
[AZURE_APP] Sending message [1]: {"temperature":24.00,"humidity":69.00}
[AZURE_APP] Message [1] is received by IoT Hub
[AZURE_APP] Sending message [2]: {"temperature":22.00,"humidity":77.00}
[AZURE_APP] Message [2] is received by IoT Hub
[AZURE_APP] Sending message [3]: {"temperature":27.00,"humidity":65.00}
[AZURE_APP] Message [3] is received by IoT Hub
- The Device Explorer shows that the IoT hub has successfully received device-to-cloud data from your device:
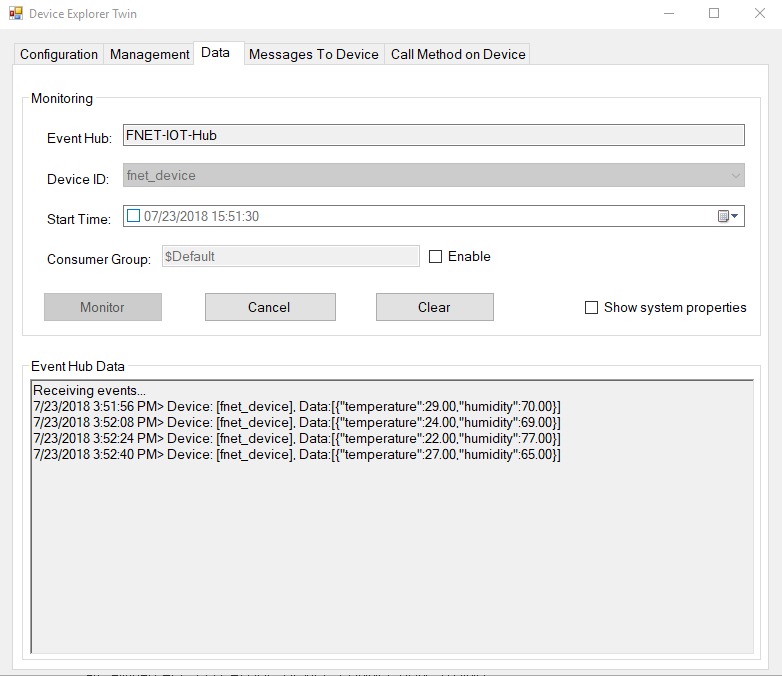
Device Explore receiving events
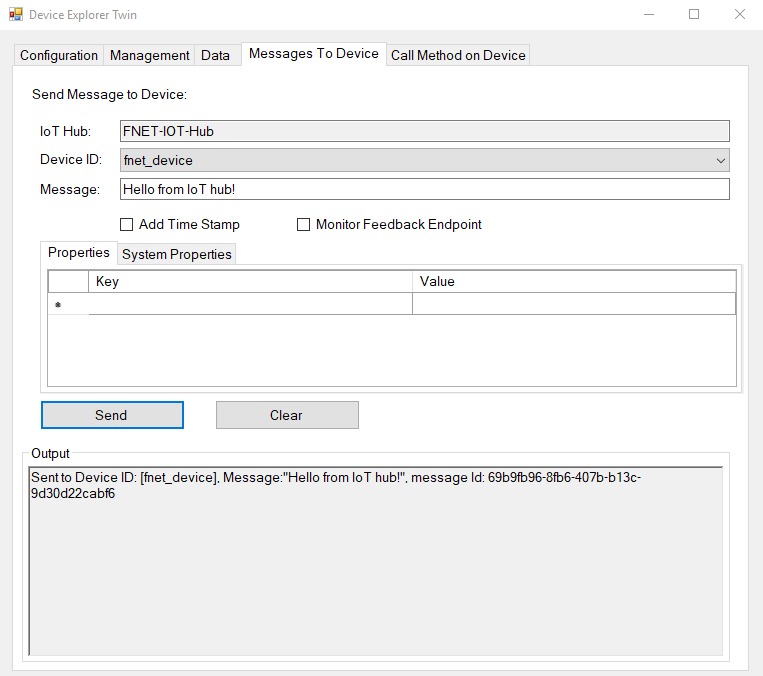
- To verify that you can send messages from the IoT Hub to your device:
- To stop the demo application press [Ctr+C] in the terminal window, or send "quit" message to the device using the Device Explorer application.
- Note
- More information about MS Azure IoT Hub: https://docs.microsoft.com/en-us/azure/iot-hub/
- The application project includes:
- FreeRTOS. Its source code is located in fnet/third_party/freertos-x.x.x/.
- MbedTLS. Its source code is located in fnet/third_party/mbedtls-x.x.x/.
- Azure IoT Hub Device C SDK. Its source code is located in fnet/third_party/azure_iot-x.x.x/.